|
Size: 7475
Comment:
|
Size: 8003
Comment:
|
| Deletions are marked like this. | Additions are marked like this. |
| Line 21: | Line 21: |
| In this panel, you can specify certain parameters for the annotation. Words contained in the gene set description column will be used to automatically generate labels. To proceed immediately, select a clustering algorithm from the dropdown menu. [[http://micans.org/mcl/|MCL clustering]] is recommended by default. For more refined clustering, you can run clusterMaker on your own and then specify the column that it creates with your clusters (these will usually look something like 'mclCluster'). You can also specify your own clusters by entering it into a new column and selecting it here. Selecting the 'Layout nodes by cluster' checkbox will rearrange the nodes in your network to isolate each cluster. Selecting the 'Create Groups for clusters' checkbox will create Cytoscape Groups from the nodes in each cluster, allowing you to collapse each cluster into a single node. | In this panel, you can specify certain parameters for the annotation. To proceed immediately you can press 'Annotate!' right away without specifying any parameters, and use the default settings. === Gene set descriptions === Words contained in the gene set description column will be used to automatically generate labels. Usually these will be under the GS_DESCR column of the === Clustering === You can select a clustering algorithm from the dropdown menu. These algorithms will run in clusterMaker using their default parameters. [[http://micans.org/mcl/|MCL clustering]] is recommended by default. For more refined clustering, you can run clusterMaker on your own and then specify the column that it creates with your clusters (these will usually look something like 'mclCluster'). You can also specify your own clusters by entering it into a new column and selecting it here. === Repositioning nodes === Often there will be significant clutter between the clusters, which can potentially make the labels harder to read. Selecting the 'Layout nodes by cluster' checkbox will rearrange the nodes in your network to isolate each cluster. === Creating Groups === Selecting the 'Create Groups for clusters' checkbox will create Cytoscape Groups from the nodes in each cluster. These will allow you to collapse each cluster into a single node. |
| Line 48: | Line 60: |
| Because the labels are computed automatically, they will often need some manual adjustment or reordering of words. This can be done easily, by double clicking on the name of a cluster in the table on the Annotation Panel, typing a new name, and pressing enter. It is recommended to look at the WordClouds when doing this, by selecting WordCloud under 'Show on selection:' in the Display Options menu. To tune the labels more globally, the parameters of WordCloud can be adjusted in its panel. For these changes to take effect, you must update both the WordCloud and the annotations. | Because the labels are computed automatically, they will often need some manual adjustment or reordering of words. This can be done easily, by double clicking on the name of a cluster in the table on the Annotation Panel, typing a new name, and pressing enter. It is recommended to look at the WordClouds when doing this, by selecting WordCloud under 'Show on selection:' in the Display Options menu. To tune the labels more globally, the [[Software/WordCloudPlugin/ParameterTutorial|parameters of WordCloud]] can be adjusted in its panel. For these changes to take effect, you must update both the WordCloud and the annotations. |
Automatically Annotating an Enrichment Map
Automatic Annotation
Enrichment Maps are often large networks with multiple highly inter-connected clusters representing processes and functions that are well annotated in public databases. Summarizing these networks simplifies it allowing users to focus on the prominent themes. To do so manually is both subjective and time-consuming. Automatic Annotation makes this process easier by clustering similarly connected terms in a network (using clusterMaker) and labelling each cluster using WordCloud.
Requirements
Cytoscape version at least 3.2.0. At the time of this writing (August 2014) this has not yet been released. It is scheduled for release in late 2014. Until then, the latest working build (UNSTABLE) can be downloaded from here
WordCloud version at least 2.0.1
ClusterMaker version at least 0.9.3
EnrichmentMap version at least 2.0.2
Creating an annotation set
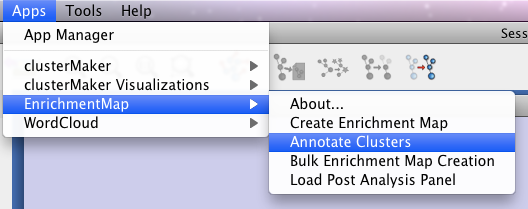
Once you have created your Enrichment Map, select “Annotate Clusters” from Enrichment Map under the Apps menu at the top of the screen to begin annotating.

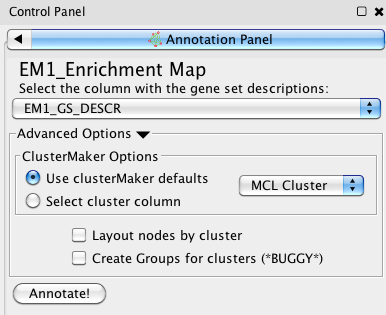
This will open an Annotation Panel in the Cytoscape Control Panel, on the left of the window.

In this panel, you can specify certain parameters for the annotation. To proceed immediately you can press 'Annotate!' right away without specifying any parameters, and use the default settings.
Gene set descriptions
Words contained in the gene set description column will be used to automatically generate labels. Usually these will be under the GS_DESCR column of the
Clustering
You can select a clustering algorithm from the dropdown menu. These algorithms will run in clusterMaker using their default parameters. MCL clustering is recommended by default. For more refined clustering, you can run clusterMaker on your own and then specify the column that it creates with your clusters (these will usually look something like 'mclCluster'). You can also specify your own clusters by entering it into a new column and selecting it here.
Repositioning nodes
Often there will be significant clutter between the clusters, which can potentially make the labels harder to read. Selecting the 'Layout nodes by cluster' checkbox will rearrange the nodes in your network to isolate each cluster.
Creating Groups
Selecting the 'Create Groups for clusters' checkbox will create Cytoscape Groups from the nodes in each cluster. These will allow you to collapse each cluster into a single node.
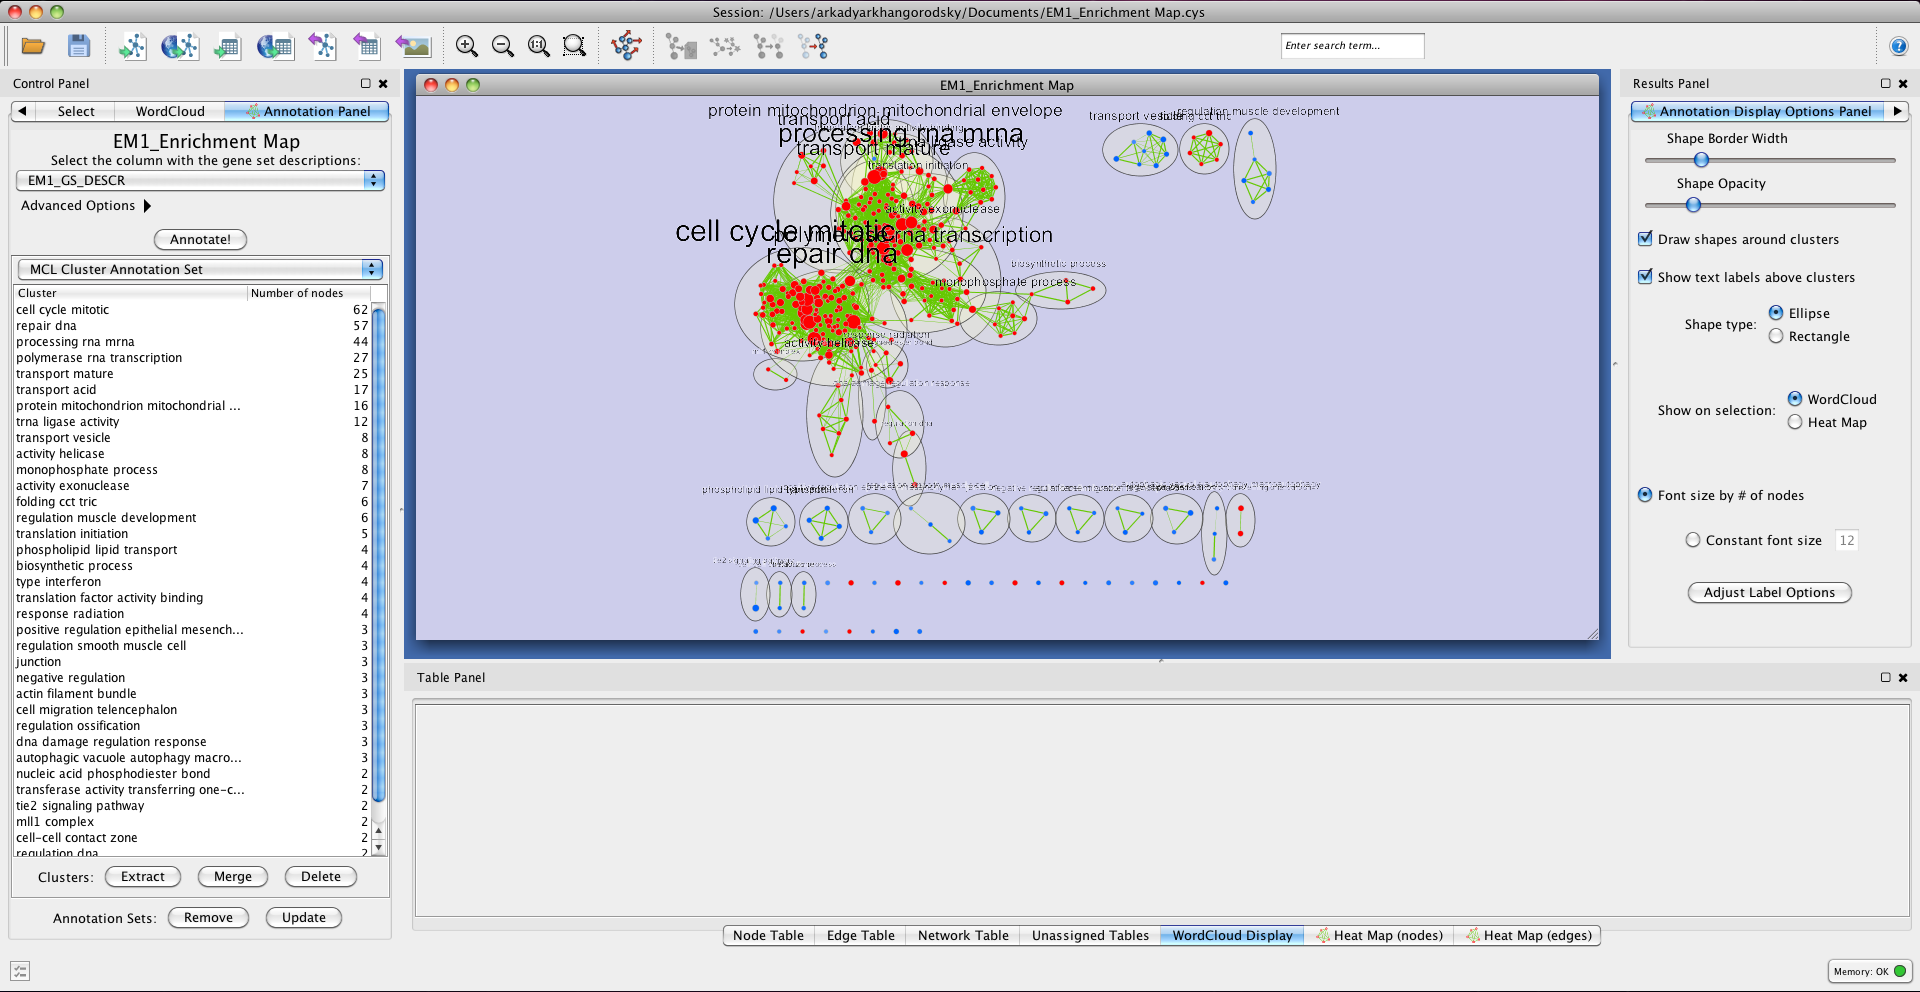
Once you are satisfied with the parameters, pressing the 'Annotate!' button will create a new annotation set. This will run clusterMaker to find the clusters in your network, create a WordCloud for each cluster, and create labels for each cluster.
The output for the example network, using the default parameters, will look like this:

Repositioning clusters
Selecting the “Layout nodes by cluster” option will rearrange the nodes in your network, grouping them by network and applying a Prefuse Force Directed Layout to each group. This reduces the amount of overlap between clusters and makes the annotations easier to read and interpret. Alternatively, repositioning can be done manually by selecting clusters in the table, dragging the nodes to a new location, and pressing the 'Update' button. Multiple clusters can be selected and moved together by doing a Command+click for Mac users or Ctrl+click for other operating systems.
Editing clusters
If you are unsatisfied with the clusters in your network, it is easy to change them by using the buttons at the bottom of the Annotation Panel.
Creating new clusters
Selecting a group of nodes and pressing the 'Extract' button will create a new cluster from the selected node(s). If you are using discrete clustering (rather than fuzzy clustering) then the selected nodes will be removed from their previous clusters.
Merging clusters
Selecting two or more clusters from the table (Ctrl/Command + click) and pressing 'Merge' will create one cluster from the selected clusters.
Deleting clusters
Selecting one or more clusters from the table and pressing 'Delete' will remove the selected clusters from the network.
Display Options
After creating your annotations, there are several visual options that you can adjust in the 'Annotation Display Options Panel' on the right side of the screen in the 'Results Panel'.
Editing labels
Because the labels are computed automatically, they will often need some manual adjustment or reordering of words. This can be done easily, by double clicking on the name of a cluster in the table on the Annotation Panel, typing a new name, and pressing enter. It is recommended to look at the WordClouds when doing this, by selecting WordCloud under 'Show on selection:' in the Display Options menu. To tune the labels more globally, the parameters of WordCloud can be adjusted in its panel. For these changes to take effect, you must update both the WordCloud and the annotations.
Frequently Asked Questions
How are the labels computed? The labels are computed by gathering all of the descriptions of each gene set and passing them to WordCloud. WordCloud parses these and assigns sizes to each word, proportional to the frequency of the words in the cluster, optionally normalized to consider how frequently the words occur in the entire network. These words are then sorted in order of size. One at a time, the largest word in the cloud is added until the label is longer than the maximum label length (by default four words). The labels also can end when the next largest word is considerably smaller than the most recent word. An advantage is given to words in the same WordCloud groups (colours) as words already added to the label, and words coming from the most central node in the cluster. ‘Considerably smaller’ is defined as below a specified fraction of the previous word’s size - by default set to be 0.3 from the first word to the second, 0.8 from second to third, and 0.9 from third to fourth. All of these parameters can be specified by selecting 'Adjust Label Options' in the 'Annotation Display Options Panel' on the right side of the screen.
Why are some of the WordClouds blank, but still giving labels? Sometimes, WordCloud assigns a font size of 0 to words appearing infrequently. The annotation process will take this into consideration and still create a label out of these words.
Why aren’t all of the clusterMaker algorithms available? Only some of the algorithms in clusterMaker produce output of the format that can be parsed and used to partition the nodes for annotations.
Contact
Arkady Arkhangorodsky (aarkhangorodsky@gmail.com)
Ruth Isserlin (ruth.isserlin@utoronto.ca)
Downloads
Known bugs
ClusterMaker doesn’t run properly on a second enrichment map
- This is a clusterMaker problem that the clusterMaker developers are working on fixing
- This also creates a problem when trying to save the session file
- To get around this, run clusterMaker through its menu rather than from the annotation panel
Groups are deleted upon saving
- This is a bug in Cytoscape
