|
Size: 1509
Comment:
|
Size: 14250
Comment:
|
| Deletions are marked like this. | Additions are marked like this. |
| Line 1: | Line 1: |
| '''~+User Manual+~''' <<TableOfContents(5)>> |
#acl All:read LaylaOesper:write,delete,revert '''~+User Manual+~''' <<TableOfContents(5)>> |
| Line 5: | Line 5: |
| The Semantic Summary Cytoscape Plugin allows you to visualize a selected set of nodes in a network as a word tag cloud. It will operate on any Cytoscape network. The tag cloud can be built based up the words in the node ID's or the words appearing in any node attribute that is comprised of Strings, or a List of Strings. The size of the words appearing in the word tag cloud is representative of the word's importance for the node selection as a function of the number of times the word appears in the selected nodes and the entire network for the selected node attribute. | The Semantic Network Summary is a Cytsocape plugin that generates a word tag cloud from a user-defined node selection, summarizing an attribute of choice. For instance, if selected nodes are proteins, and the string attribute "full protein name" is selected, every string will be broken down into words, which will be plotted on a panel with size proportional to their frequency. {{attachment:Example_Cloud1.png}} It is also possible to use the plugin to cluster words that appear together in the selected nodes. For instance, if node A has name attribute "Origin Recognition Complex 1" and node B has name attribute "Origin Recognition Complex 2", then the words "Origin", "Recognition" and "Complex" will be clustered together, following the order in which they appear. The plugin operates on any network and on any selected attributes, although it has been specifically designed for string attributes such as gene names or gene ontology annotations. {{attachment:Example_Cloud2.png}} |
| Line 8: | Line 14: |
| The Semantic Network Summary Plugin requires Cytoscape Version 2.6.x. If you don't have Cytoscape or have an older Version (2.5 or older), please download the latest Release from http://www.cytoscape.org/ and install it on your computer. * Download the Semantic Network Summary Plugin from [[GSoC2010_SoftwareDownload|here]] and manually place the file 'SemanticSummary.jar' in the 'Cytoscape/plugins' folder. |
|
| Line 12: | Line 21: |
| 1. Right click on a node in the network and select "Create Cloud". This will create a Semantic Summary Word Cloud using all of the default parameters.<<BR>> 2. Under the Plugins Menu, select Semantic Network Summary >> Create Cloud. This will create a Semantic Summary Word Cloud using all of the default parameters.<<BR>> 3. Under the Plugins Menu, select Semantic Network Summary >> Settings. This will load the Semantic Summary Input Panel on the left side of the screen. At the bottom right corner of this panel is a button labeled "Create" that will also create a Semantic Summary Word Cloud.<<BR>> |
* Right click on a node in the network and select "Create Cloud". This will create a Semantic Summary Word Cloud using all of the default parameters. * Under the Plugins Menu, select Semantic Network Summary / Create Cloud. This will create a Semantic Summary Word Cloud using all of the default parameters. * Under the Plugins Menu, select Semantic Network Summary / Settings. This will load the Semantic Summary Input Panel on the left side of the screen in the control panel. At the bottom right corner of this panel is a button labeled "Create" that will also create a Semantic Summary Word Cloud. You can use the parameter defaults for all of these methods for creating a Semantic Summary Word Cloud. For a more careful choice of the parameter settings, please go to the Full User Guide. === Exploring the Semantic Summary Word Cloud === * The "Network" tab in the "Control Panel" on the left lists all available networks in the current session. At the bottom it also has an overview of the current network which allows for easy navigation in a network, as well as high zoom levels which can be obtained by dragging the blue rectangle (the current view) over the network. * The "Semantic Summary" tab will be loaded into the "Control Panel" on the left whenever a Semantic Summary Word Cloud is first created, or the Semantic Network Summary / Settings option is selected from the Plugins Menu. This tab contains a list of all Word Clouds created for the currently selected Network as well as all of the parameters that can be set by a user on both the cloud and the network level. * The "Semantic Summary Cloud" tab in the "Data Panel" on the bottom side of the window is where a Semantic Summary Word Cloud will be displayed. === Advanced Tips === * With large networks and low zoom-levels Cytoscape automatically reduces the details (such as hiding the node labels and not showing the node borders). To override this mechanism click on "View / Show Graphics Details" * To see which nodes in the network contain a word in the tag cloud, click on the word in the tag cloud in the data panel. If a Network View is available for the network from which the cloud was created, all nodes in the network that contain the specified word in the chosen attribute will be highlighted. ----- == Full User Guide == <<Anchor(parameters)>> === Tips on Parameter Choice === ==== Attribute Choice ==== The Attribute Choice parameter appears within the Cloud Parameters section of the Input Panel. This parameter allows a user to choose which Cytoscape attribute to build their word cloud from. The options include the node ID (the default option) and all currently available attributes of the type String or List. Notice, that for an attribute of type List, only those entries that are String will be used to build the word cloud. When changing the attribute that a cloud is built from, a user must hit the "Update" button to see the updated results for the current cloud. ==== Network Normalization ==== The Advanced portion of the Cloud Parameters section of the Input panel contains a checkbox labeled "Normalize word size using selection/network ratios". When this checkbox is not selected, the size of words in the cloud are directly proportional to their frequency in only the selected nodes. When the checkbox is selected the Network Normalization slider bar becomes visible and word size is now calculated using a weighted ratio of the word frequency in the selected nodes to its frequency in the entire network. The slider bar determines how much weight to give word frequency counts in the entire network when determining word size. Specifically, the size of any word W in a tag cloud is directly proportional to: (sel_W / sel_tot) / (net_W / net_tot)^k, where sel_W is the number of selected nodes that contain W, sel_tot is the total number of selected nodes, net_W is the number of nodes in the entire network that contain W, net_tot is the total number of nodes in the network, and k is the network normalization factor. The Network Normalization parameter determines how much the frequency in the network down-weights the size of a word. * Network Normalization = 0 --> there is no network normalization, the size of a word is simply proportional to its frequency in the node selection * Network Normalization = 1 --> maximal network normalization The default value is 0. ==== Word Aggregation Cutoff ==== The Word Aggregation Cutoff parameter appears in the Advanced portion of the Cloud Parameters section of the Input panel. This parameter is used only with cloud layouts that incorporate word clustering. Words are aggregated in such a way that their order in the cluster reflects which words appear next to each other in the selected nodes in the network. The word clusters are built by aggregating pairs of words. Specifically, the Semantic Network Summary plugin uses a greedy algorithm in combination with heirarchical clustering to create the word clusters that a user will see. The algorithm used for word aggregation utilizes a probability value given to every ordered pair of words that appears next to each other in at least one selected node in the network. This probability value is the ratio of the observed joint probability of these words appearing next to each other, divided by the probability of these words appearing next to each other if their occurences were independent of each other. Only word pairs having this probability value above or equal to the Word Aggregation Cutoff can appear next to each other in a single cluster. As an example, lets say that you have a network with the following 6 nodes: Regulation of apoptosis Positive regulation of apoptosis Positive regulation of programmed cell death Immune response Activation of immune response Activation of humoral immune response A user selects all nodes in the network and creates a clustered cloud with Word Aggregation Cutoff = 3. The algorithm begins by placing each word that appears in its own cluster, and then begins the clustering process. In this example the first pair of words that will be clustered together are "programmed" and "cell" since they have the highest pair probability. Here are their associated probabilites: P(programmed) = 1/6 (since it appears in 1 out of 6 total nodes) P(cell) = 1/6 (since it appears in 1 out of 6 total nodes) P(cell | programmed) = 1 (since everytime that programmed appears, it is followed by cell) Pair Probability - P (programmed, cell) = P(cell | programmed) * P (programmed) / P(cell) * P(programmed) = 6.0 Since, 6.0 >= our Word Aggregation Cutoff of 3, we combine these two words into a new cluster. Now, we look at our next pair of eligible words, which happens to be "cell" and "death". This pair also has a pair probability value of 6.0, so we now have a 3 word cluster containing "programmed cell death" and all other words are in their own clusters. The next word pair that comes up is " activation" and "humoral" which has a pair probability of 3.0. All other eligible pairs of words have a pair probability less than 3 (our cutoff value), so we are done clustering. The resulting cloud (with Network Normalization = 0.5) is as follows: {{attachment:Word_Aggregation_Example.png}} Since, the Word Aggregation Cutoff serves as a clustering threshold, smaller values for this parameter will usually translate to larger clusters of words. If this parameter is sufficiently large, every word will appear in its own cluster. ==== Cloud Layout ==== The Cloud Layout style parameter appears within the Cloud Parameters section of the Input Panel. The choice of cloud layout style will affect the look and feel of the word tag cloud that appears. This is also where a user will determine if they want their word tag cloud to include clustering. Below are examples of the same word cloud with the different layout style options. Clustered-Standard: {{attachment:Style-Clustered-Standard.png|Style-Clustered-Standard.jpg}} Clustered-Boxes: {{attachment:Style-Clustered-Boxes.png|Style-Clustered-Boxes.jpg}} Non-Clustered: {{attachment:Style-Non-Clustered.png}} ==== Word Exclusion List ==== The Word Exclusion List parameters appear in the Network Parameters section of the Input panel. The word exclusion list contains a set of words that are to be ignored when completing the semantic analysis of the selected nodes in the network. Any words added to or removed from the word exclusion list will affect all clouds subsequently created or updated for the network. Initially the word exclusion list will always contain a list of commonly used words in the English language, as well as a special list of "flagged words" that includes things like the names of biological databases. === The Input Panel === {{attachment:Input_Panel_New.png}} 1. '''Cloud List''' - A list of all clouds that exist for the current network. If no network is currently selected, then this section will display "No Network Loaded". A cloud can be renamed by selecting the cloud in the list, right clicking on the mouse and selecting "Edit Cloud Name". No two clouds for the same network can have the same name. By default the clouds will be named using sequential numbering. 2. '''Attribute Choice''' - Allows the user to specify which attribute to use when building the word cloud. 3. '''Advanced''' - User can specify the maximum number of words to display in the word cloud, as well as the [[#parameters|Network Normalization]] and [[#parameters|Word Aggregation Cutoff]]. 4. '''Cloud Layout''' - The user has a choice of serveral different styles for the layout of the word tag cloud. This is where a user will select whether or not they want to see a layout that includes clustering. 5. '''Word Exclusion List''' - A user can add or remove words to be ignored when building the word cloud. The list of words to filter out is applicable at the network level. Hence, any words added or removed while a particular cloud is selected in the cloud list will affect all future clouds created or updated from the network associated with that cloud. * This list initially contains a set of commonly occuring English "Stop Words" that are automatically filtered out. * This list initially contains a set of commonly occuring "Flagged Words" (e.g. kegg, reactome) that are automatically filtered out. 6. '''Actions''' - The user has three choices: Delete (deletes the currently selected cloud, Update (takes in all parameters, the set of currently selected nodes, and all nodes in the network and builds an updated word cloud), and Create (takes in all parameters, the set of currently selected nodes, and all nodes in the network and builds a new word cloud). === The Cloud Display Panel === * Appears in the bottom (south) data panel. * Is refreshed every time a cloud is selected from the input panel, a network is brought into focus, a cloud is created, updated or deleted. * If a network view is available for the current network, clicking on a word in the currently displaying word cloud will highlight all nodes in the network that currently contain that word in the attribute that the word cloud was created using. === Default and Valid Parameter Values === '''Node ID/Attribute:''' * Defines which node value to use for semantic analysis. * Default Value: node ID '''Max Num of Words''': * Determines the maximum number of words to display in the Cloud Display Panel. If the this number is less than the total number of possible words, only the most significant words will be displayed. * Default Value: 250 * Valid Values: >=0 '''Network Normalization''': * Network Normalization weight used when calculated word size - see [[#parameters|parameter tips]] for more details. * Default Value: 0.5 * Valid Values: >=0.0, <=1.0 '''Word Aggregation Cutoff''': * Minimal acceptable probability value for any pair of words to appear next to each other in a cluster - see [[#parameters|parameter tips]] for more details. * Default Value: 1 * Valid Values: >=0.0 '''Style''': * Visual style for the cloud layout * Devault Value: Clustered-Standard - a layout style where the words are clustered into groups. All the words in a single cluster will appear in together in the cloud in a unified color. |
User Manual
Overview
The Semantic Network Summary is a Cytsocape plugin that generates a word tag cloud from a user-defined node selection, summarizing an attribute of choice. For instance, if selected nodes are proteins, and the string attribute "full protein name" is selected, every string will be broken down into words, which will be plotted on a panel with size proportional to their frequency.
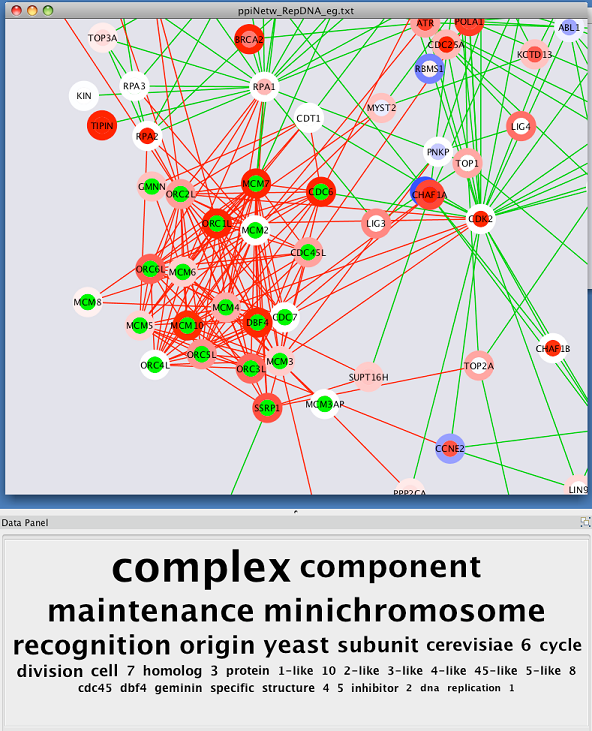
It is also possible to use the plugin to cluster words that appear together in the selected nodes. For instance, if node A has name attribute "Origin Recognition Complex 1" and node B has name attribute "Origin Recognition Complex 2", then the words "Origin", "Recognition" and "Complex" will be clustered together, following the order in which they appear. The plugin operates on any network and on any selected attributes, although it has been specifically designed for string attributes such as gene names or gene ontology annotations.
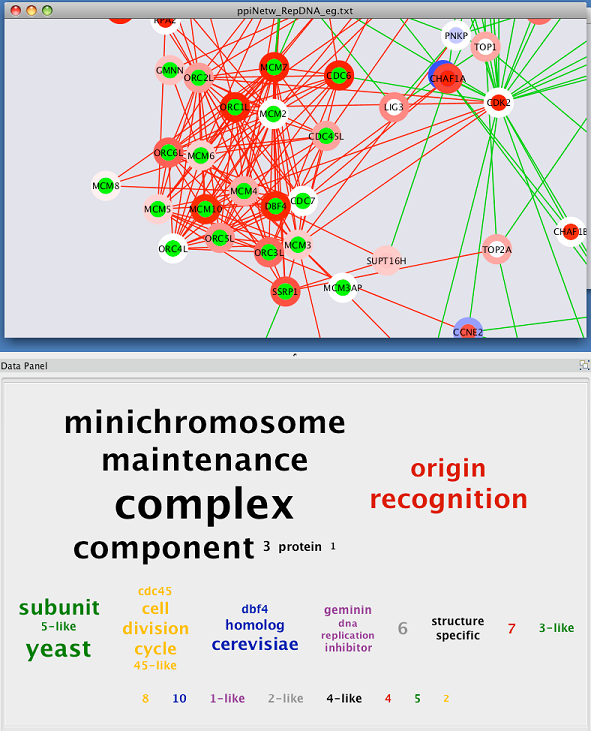
Installation
The Semantic Network Summary Plugin requires Cytoscape Version 2.6.x. If you don't have Cytoscape or have an older Version (2.5 or older), please download the latest Release from http://www.cytoscape.org/ and install it on your computer.
Download the Semantic Network Summary Plugin from here and manually place the file 'SemanticSummary.jar' in the 'Cytoscape/plugins' folder.
Quick Start Guide
Creating a Semantic Summary Word Cloud
After loading a Cytoscape network, and selecting the nodes of interest, there are 3 locations from which you can create a Semantic Summary Word Cloud.
- Right click on a node in the network and select "Create Cloud". This will create a Semantic Summary Word Cloud using all of the default parameters.
- Under the Plugins Menu, select Semantic Network Summary / Create Cloud. This will create a Semantic Summary Word Cloud using all of the default parameters.
- Under the Plugins Menu, select Semantic Network Summary / Settings. This will load the Semantic Summary Input Panel on the left side of the screen in the control panel. At the bottom right corner of this panel is a button labeled "Create" that will also create a Semantic Summary Word Cloud.
You can use the parameter defaults for all of these methods for creating a Semantic Summary Word Cloud. For a more careful choice of the parameter settings, please go to the Full User Guide.
Exploring the Semantic Summary Word Cloud
- The "Network" tab in the "Control Panel" on the left lists all available networks in the current session. At the bottom it also has an overview of the current network which allows for easy navigation in a network, as well as high zoom levels which can be obtained by dragging the blue rectangle (the current view) over the network.
- The "Semantic Summary" tab will be loaded into the "Control Panel" on the left whenever a Semantic Summary Word Cloud is first created, or the Semantic Network Summary / Settings option is selected from the Plugins Menu. This tab contains a list of all Word Clouds created for the currently selected Network as well as all of the parameters that can be set by a user on both the cloud and the network level.
- The "Semantic Summary Cloud" tab in the "Data Panel" on the bottom side of the window is where a Semantic Summary Word Cloud will be displayed.
Advanced Tips
- With large networks and low zoom-levels Cytoscape automatically reduces the details (such as hiding the node labels and not showing the node borders). To override this mechanism click on "View / Show Graphics Details"
- To see which nodes in the network contain a word in the tag cloud, click on the word in the tag cloud in the data panel. If a Network View is available for the network from which the cloud was created, all nodes in the network that contain the specified word in the chosen attribute will be highlighted.
Full User Guide
Tips on Parameter Choice
Attribute Choice
The Attribute Choice parameter appears within the Cloud Parameters section of the Input Panel. This parameter allows a user to choose which Cytoscape attribute to build their word cloud from. The options include the node ID (the default option) and all currently available attributes of the type String or List. Notice, that for an attribute of type List, only those entries that are String will be used to build the word cloud. When changing the attribute that a cloud is built from, a user must hit the "Update" button to see the updated results for the current cloud.
Network Normalization
The Advanced portion of the Cloud Parameters section of the Input panel contains a checkbox labeled "Normalize word size using selection/network ratios". When this checkbox is not selected, the size of words in the cloud are directly proportional to their frequency in only the selected nodes. When the checkbox is selected the Network Normalization slider bar becomes visible and word size is now calculated using a weighted ratio of the word frequency in the selected nodes to its frequency in the entire network. The slider bar determines how much weight to give word frequency counts in the entire network when determining word size. Specifically, the size of any word W in a tag cloud is directly proportional to: (sel_W / sel_tot) / (net_W / net_tot)^k, where sel_W is the number of selected nodes that contain W, sel_tot is the total number of selected nodes, net_W is the number of nodes in the entire network that contain W, net_tot is the total number of nodes in the network, and k is the network normalization factor.
The Network Normalization parameter determines how much the frequency in the network down-weights the size of a word.
Network Normalization = 0 --> there is no network normalization, the size of a word is simply proportional to its frequency in the node selection
Network Normalization = 1 --> maximal network normalization
The default value is 0.
Word Aggregation Cutoff
The Word Aggregation Cutoff parameter appears in the Advanced portion of the Cloud Parameters section of the Input panel. This parameter is used only with cloud layouts that incorporate word clustering. Words are aggregated in such a way that their order in the cluster reflects which words appear next to each other in the selected nodes in the network. The word clusters are built by aggregating pairs of words. Specifically, the Semantic Network Summary plugin uses a greedy algorithm in combination with heirarchical clustering to create the word clusters that a user will see.
The algorithm used for word aggregation utilizes a probability value given to every ordered pair of words that appears next to each other in at least one selected node in the network. This probability value is the ratio of the observed joint probability of these words appearing next to each other, divided by the probability of these words appearing next to each other if their occurences were independent of each other. Only word pairs having this probability value above or equal to the Word Aggregation Cutoff can appear next to each other in a single cluster.
As an example, lets say that you have a network with the following 6 nodes:
Regulation of apoptosis
Positive regulation of apoptosis
Positive regulation of programmed cell death
Immune response
Activation of immune response
Activation of humoral immune response
A user selects all nodes in the network and creates a clustered cloud with Word Aggregation Cutoff = 3. The algorithm begins by placing each word that appears in its own cluster, and then begins the clustering process. In this example the first pair of words that will be clustered together are "programmed" and "cell" since they have the highest pair probability. Here are their associated probabilites:
P(programmed) = 1/6 (since it appears in 1 out of 6 total nodes)
P(cell) = 1/6 (since it appears in 1 out of 6 total nodes)
P(cell | programmed) = 1 (since everytime that programmed appears, it is followed by cell)
Pair Probability - P (programmed, cell) = P(cell | programmed) * P (programmed) / P(cell) * P(programmed) = 6.0
Since, 6.0 >= our Word Aggregation Cutoff of 3, we combine these two words into a new cluster. Now, we look at our next pair of eligible words, which happens to be "cell" and "death". This pair also has a pair probability value of 6.0, so we now have a 3 word cluster containing "programmed cell death" and all other words are in their own clusters. The next word pair that comes up is " activation" and "humoral" which has a pair probability of 3.0. All other eligible pairs of words have a pair probability less than 3 (our cutoff value), so we are done clustering. The resulting cloud (with Network Normalization = 0.5) is as follows:

Since, the Word Aggregation Cutoff serves as a clustering threshold, smaller values for this parameter will usually translate to larger clusters of words. If this parameter is sufficiently large, every word will appear in its own cluster.
Cloud Layout
The Cloud Layout style parameter appears within the Cloud Parameters section of the Input Panel. The choice of cloud layout style will affect the look and feel of the word tag cloud that appears. This is also where a user will determine if they want their word tag cloud to include clustering. Below are examples of the same word cloud with the different layout style options.
Clustered-Standard:
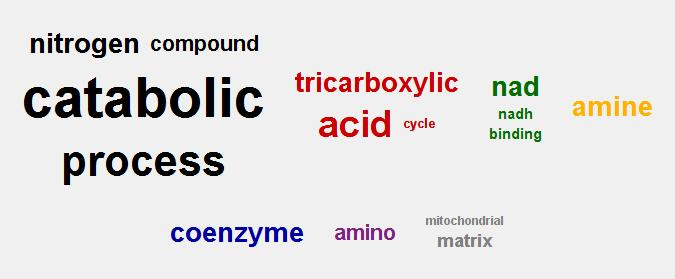
Clustered-Boxes:
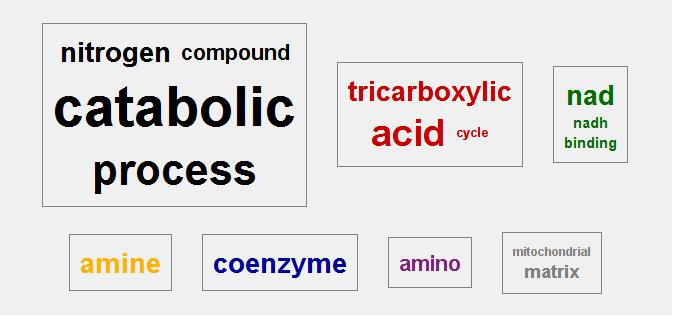
Non-Clustered:

Word Exclusion List
The Word Exclusion List parameters appear in the Network Parameters section of the Input panel. The word exclusion list contains a set of words that are to be ignored when completing the semantic analysis of the selected nodes in the network. Any words added to or removed from the word exclusion list will affect all clouds subsequently created or updated for the network. Initially the word exclusion list will always contain a list of commonly used words in the English language, as well as a special list of "flagged words" that includes things like the names of biological databases.
The Input Panel
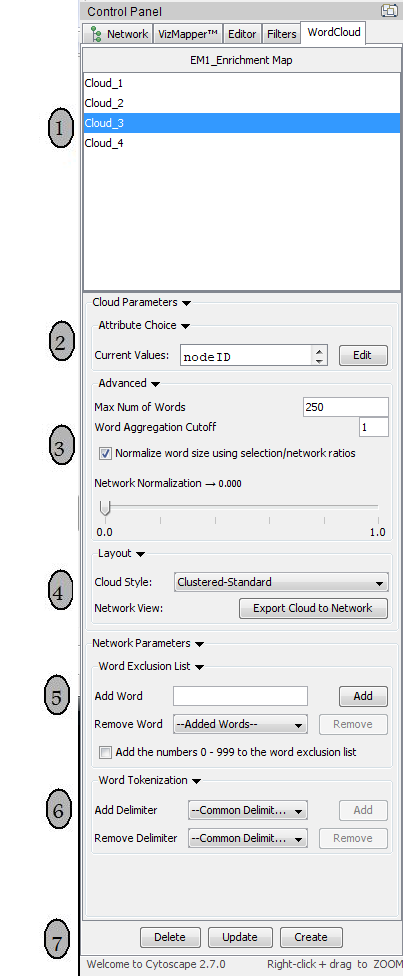
1. Cloud List - A list of all clouds that exist for the current network. If no network is currently selected, then this section will display "No Network Loaded". A cloud can be renamed by selecting the cloud in the list, right clicking on the mouse and selecting "Edit Cloud Name". No two clouds for the same network can have the same name. By default the clouds will be named using sequential numbering.
2. Attribute Choice - Allows the user to specify which attribute to use when building the word cloud.
3. Advanced - User can specify the maximum number of words to display in the word cloud, as well as the Network Normalization and Word Aggregation Cutoff.
4. Cloud Layout - The user has a choice of serveral different styles for the layout of the word tag cloud. This is where a user will select whether or not they want to see a layout that includes clustering.
5. Word Exclusion List - A user can add or remove words to be ignored when building the word cloud. The list of words to filter out is applicable at the network level. Hence, any words added or removed while a particular cloud is selected in the cloud list will affect all future clouds created or updated from the network associated with that cloud.
- This list initially contains a set of commonly occuring English "Stop Words" that are automatically filtered out.
- This list initially contains a set of commonly occuring "Flagged Words" (e.g. kegg, reactome) that are automatically filtered out.
6. Actions - The user has three choices: Delete (deletes the currently selected cloud, Update (takes in all parameters, the set of currently selected nodes, and all nodes in the network and builds an updated word cloud), and Create (takes in all parameters, the set of currently selected nodes, and all nodes in the network and builds a new word cloud).
The Cloud Display Panel
- Appears in the bottom (south) data panel.
- Is refreshed every time a cloud is selected from the input panel, a network is brought into focus, a cloud is created, updated or deleted.
- If a network view is available for the current network, clicking on a word in the currently displaying word cloud will highlight all nodes in the network that currently contain that word in the attribute that the word cloud was created using.
Default and Valid Parameter Values
Node ID/Attribute:
- Defines which node value to use for semantic analysis.
- Default Value: node ID
Max Num of Words:
- Determines the maximum number of words to display in the Cloud Display Panel. If the this number is less than the total number of possible words, only the most significant words will be displayed.
- Default Value: 250
Valid Values: >=0
Network Normalization:
Network Normalization weight used when calculated word size - see parameter tips for more details.
- Default Value: 0.5
Valid Values: >=0.0, <=1.0
Word Aggregation Cutoff:
Minimal acceptable probability value for any pair of words to appear next to each other in a cluster - see parameter tips for more details.
- Default Value: 1
Valid Values: >=0.0
Style:
- Visual style for the cloud layout
- Devault Value: Clustered-Standard - a layout style where the words are clustered into groups. All the words in a single cluster will appear in together in the cloud in a unified color.
